Friday, December 21, 2012

Festive Fun for Everyone!

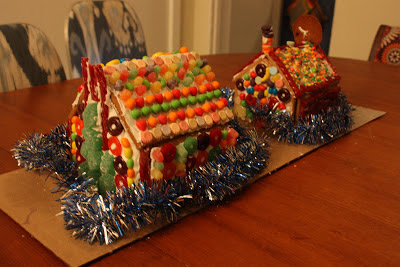
A couple of nights ago, we had a group of friends over for a little holiday fun! I whipped up a tasty dinner, and then followed the meal with a classic candy-coated activity: decorating gingerbread houses!

Because we decorated houses last year, I already knew what presented the largest obstacle to this activity-- the construction of the houses-- so I got an early jump on that by gluing them together in advance. This is best done with a hot-glue gun, but if you forgot yours upstate (curses!) you can also resort to gluing your gingerbread pieces onto a cardboard box with some wood glue and a little blue painter's tape. (Unconventional, I know, but it totally worked!) I assure you, this is a much better system than trying to assemble the gingerbread house using only the frosting provided after everybody's already had a couple of drinks. We tried that route last year, and it ended in some very misshapen roof-lines. : )

We built two houses, which were equally successful, in large part because the majority of our dinner guests were once art school attendees. I briefly considered building four houses and holding a couples decorating competition, but then I realized I'd end up stuck with 4 gingerbread houses, and that seemed really unappealing. 


All in all, a fantastic after-dinner activity. If it wasn't so utterly unseasonable, I'd suggest doing this all-year round. Maybe during the summer you could decorate them and give the houses beautiful, vertile gardens, and pay less attention to the actual houses? 

Add that to the to-do list for this coming summer! 

Happy Holidays Everybody! 

Wednesday, December 19, 2012

Appetizers for Easy Festive Fun!

I've been invited to a mommy-baby-Christmas party this year, and have volunteered to bring a couple of appetizers to get things started. A personal favorite are bacon-wrapped bread sticks, which are literally the easiest thing to make, ever. They're very literal. Bacon. Wrapped. Bread. Sticks.

Yep.

So-- here are the instructions, just in case you require additional details.

INGREDIENTS: 
1- package of breadsticks
The ones I'm using are the Alessi Breadsticks pictured at left, but that's just because those were the only ones available in our local grocery store. In truth, a slightly thicker breadstick actually works a little better...

1-package of good quality bacon (if you don't go in for pork, I'm pretty sure this could also be delicious with duck bacon!)
3/4 cup of lightly packed brown sugar
                                         3 Tablespoons for chili powder

DIRECTIONS:
Preheat the oven to 350 degrees. On a platter, combine the brown sugar and chili powder, and mix thoroughly together. Set aside. Cut each slice of bacon in half lengthwise, and then wrap each piece around a breadstick. Roll each breadstick in the brown-sugar-chili-powder mixture.

Set up a long, rimmed cooking sheet (jelly roll pan) with a layer of foil, and then a cooling rack on top if you've got one. Place the breadsticks on the cooling rack, and then send into the oven for 20-25 minutes. Let cool for 10-15 minutes, and then serve at room temperature. (If you don't have a cooling rack, not the end of the world. Just stick the bacon straight onto the foil and cook the same way.)

THAT'S IT FOLKS! Easy-breezy! SO GOOD! 

Saturday, December 15, 2012

Ps. Countdown to garland project!

One more from Land Of Nod

I just received notice that my felt-balls have shipped from Etsy, so hopefully we're just a couple days away from getting to put this D-I-Y garland plan into action. In the meantime, I've bumped into tons of other felt-garland manifestations, so if you don't want to wait for an Etsy shipment, or don't have the time/interest in a D-I-Y this season, check out these alternatives...

Large & Small from Anthropologie...


Not felt, but equally fun from West Elm!

I'm beginning to suspect that Do-It-Yourself and Buy-It-From-The-Store might end up costing virtually the same amount, but I suppose I'll be able to say with pride that I made mine by hand... Oh joy.

Good news! I don't think the world is ending next week.

Apparently there's quite a ta-doo about the world ending this coming week, but John just sent me a video that should calm all of your nerves-- assuming you're in the least bit worried. I'm hoping they're right, because I'm really looking forward to making my felt-ball-garland at some point during my Christmas vacation and really looking forward to my Christmas vacation in general.

So-- check out the video-- and then we should all check back in on December 22nd to confirm that we're all still here.


So-- here's hoping folks! I'm planning to see all of you on Saturday, the 22nd! 

Hearty Beef Stew for a Chilly Weekend Night

John and I had a motley crew of vegetables packed for the country, and I was determined to eat them this weekend... I am so over lugging food back and forth from the city to the country, as everything gets softer, squishier, and more bruised. Butternut squash: we're eatin' it! Bag o' carrots: Getting cooked! Bits of celery: Well... we'll see. John suggested ants-on-a-log for those. : ) Onions, garlic, potatoes: They're all goin' down!

We also had two funny steaks in the freezer that we'd picked up at our grocery store out here. They were organic, grass-fed, vacuum-packed steaks that cost a whopping $3.50 each, so we bought them on a whim and stuck them in the freezer. John recently heard a piece on the radio saying that beef stew was best made with steak meat instead of stew meat (we can't remember where or why... sorry) which inspired us to thaw those steaks and chop them up for a hearty beef stew. John found the recipe below on the Martha Stewart website and it was a total breeze.

We made a couple of small revisions to the recipe-- 1.) We made a half portion since it was only for the two of us. 2.) We browned the beef before adding the rest of the ingredients to the dutch oven. 3.) We added 1-part red wine and 1-part beef stock instead of the water recommended. 4.) We cut the cook time down to 1-1/2 hours because there was less liquid and we weren't sure how that would change the end product. But seriously. Take a look at the instructions for this recipe. There are literally 2 1/2 steps. E-Z. And we were able to use the steaks, the onions, the potatoes, the carrots, and the garlic-- all in one pot. (Don't worry-- I chopped up the butternut squash and roasted it on a pan below the dutch oven while the stew cooked. And resigned myself to celery sticks for a snack tomorrow...)

Ingredients

  • 3 pounds beef chuck, trimmed of visible fat and cut into 1 1/2-inch cubes
  • 1/3 cup tomato paste
  • 3 tablespoons balsamic vinegar
  • 2 tablespoons all-purpose flour
  • Coarse salt and ground pepper
  • 1 pound medium onions (about 2), cut into 1-inch chunks
  • 1 pound small white or red new potatoes (about 6), well scrubbed, halved if large
  • 1 pound carrots, cut into 1 1/2-inch lengths
  • 6 garlic cloves, smashed
  • 2 bay leaves

Directions

  1. Preheat oven to 350 degrees. In a Dutch oven (5-quart) with a tight-fitting lid, combine beef*, tomato paste, vinegar, and flour; season with salt and pepper. 
    *This is where we browned the beef. We cubed our steaks into 2.5" pieces, patted them dry, added salt & pepper, and then tossed the beef into a hot dutch oven on the stove top. We browned the cubes on both sides,then we added the balsamic vinegar and 3/4 cup of red wine and let it sear off for a second. After, we took it off the heat to add the other ingredients (the tomato paste, flour, s & p) 
  2. Add onions, potatoes, carrots, garlic, bay leaves, and 3 cups water. Return to the stove and bring to a boil. Cover, transfer to oven, and cook until meat is fork-tender, 2 to 2 1/2 hours. Remove bay leaves and, if desired, season with salt and pepper before serving.

Friday, December 7, 2012

Festive Garland or... Kid's Room Decoration?

I just found this felt garland on the Dwell Studio website and I love it! It's so fun and festive, but it's also so $30.00, and for only five feet, I think I'd end up spending considerably more than $30.00 to actually make it look good as a holiday decoration.


But it got me thinking... as my lack of money often does... and I think I'm going to attempt to make this myself. I think it will be such a fun Christmas decoration, but I also think it would make an awesome kid's room decoration too! I was thinking I could string it up near the ceiling in Julian's room, or even hang it in swags on the brass headboard of the bed in his room at Fox Ridge.


I've tracked down a giant bag of felt balls, actually, 100 felt balls to be exact, which I bought on Etsy. They are available from a bunch of different sources, but I really wanted mine to be 1" diameter like the Dwell Studio version, so I had to search a little farther afield to find the right source. The coolest thing is that I was also able to choose which colors I get, so I'm not going to end up with 12 snot-colored felt balls or 18 hot pinks. I've only ordered 100 balls so far (which should make me 2 1/2 Dwell-Studio-sized garlands) but if this is a success, I might order more.

I woke up feeling crafty this morning! 

Happy Hanukkah, right around the corner!

Hanukkah begins tomorrow, and I'm thrilled to have a legitimate excuse to shred up pounds of potatoes and fry them in grease. "Why is this night different from every other night?" (I know-- wrong holiday!) Because I've been TOLD to eat stacks of hash-browns! I have a duty to eat stacks of hash-browns! And who am I to shirk my duties? No chance.

I got even more excited when I bumped into this recipe-- which looked awfully promising. The fact that the article was titled "Crispy Miracles" did nothing to calm my excitement, believe it or not. Please note that they recommend frying these in duck fat. My kind of folks! I'm hoping to whip up a batch tomorrow night and will report back with details.


Latkes with Quince Conserva

Recipe adapted from Craig Stoll, Delfina, San Francisco


Yield: 12 latkes (plus 3 cups quince conserva)


INGREDIENTS

Latkes
3 large russet potatoes (about 2 pounds)
1 tablespoon kosher salt
1 medium yellow onion, finely grated
1 large egg, lightly beaten
½ cup all-purpose flour
3 cups duck fat (or vegetable oil)     : )

Apple-quince conserva
1 pound tart apples (such as Granny Smith or Gravenstein)--peeled, cored and cut into 1-inch cubes
1 pound ripe quince--peeled, cored and cut into 1-inch cubes
2 whole star anise
2 whole cloves
1 cup Vin Santo
4 cups water
¼ cup granulated sugar
1 teaspoon kosher salt


DIRECTIONS


1. Add the potatoes to a large pot; fill the pot with enough cold water to cover the potatoes by a couple of inches. Bring to a boil, then immediately turn off the heat, drain the potatoes through a colander and transfer to a plate. Refrigerate the potatoes overnight.
2. Make the apple-quince conserva: In a large saucepan, add the apples, quince, star anise, cloves, Vin Santo and water. Bring to a boil over high heat. Reduce the heat to low and simmer until the fruit completely breaks down, 20 to 25 minutes. Return the heat to medium and cook, stirring frequently until the fruit thickens and takes on a deep red hue. Add the sugar and season with salt and stir to combine. Return the mixture to a boil and cook until the sugar dissolves and the texture of the conserva is thick. Place a fine-mesh strainer over a medium bowl and use a rubber spatula to press the mixture through the sieve.
3. The next day, peel the potatoes with a paring knife and use the coarse side of a grater to grate the potatoes (or the large shredder attachment on a food processor). Season with salt. Add the grated onion to a fine-mesh sieve and set over a medium bowl. Use a spatula to press the water out of the onions and discard the water. Add the onions and the egg to the potatoes and use a fork to mix. Sprinkle in the flour and mix gently until there are no dry patches of flour remaining.
4. Preheat the oven to 325°. In a large, wide pot, heat the duck fat until it reads between 350° and 370° on an instant-read thermometer.
5. Gently form a good handful of the potato mixture into a latke (about ¼ cup of potatoes per latke), using your hands to compress it into a ¼-inch-thick disc, leaving the edges a bit loose and scraggly.
6. Gently transfer a few latkes to the hot duck fat, leaving plenty of space around each one. Cook until both sides are golden, 3 to 4 minutes per side. Use a frying spider or metal spatula to transfer the latkes to a paper towel-lined baking sheet. Keep warm in the oven while you fry the rest of the latkes. Sprinkle with kosher salt and serve warm with apple-quince conserva.


Thursday, December 6, 2012

Another window display in Manhattan!


While brainstorming ideas for my other window display at Broadway Carpet, I suggested that we do  a nursery window to appeal to the prospective shoppers from the Pottery Barn Baby and Bellini Baby right up the street. After we'd decided on the "Modern Winter" window, I sort of figured my nursery idea was on hold, but then-- surprise! The manager of the store decided they'd clear another window for me and let me at it! Terrific!

After a quick hunt around on Craig's List, I found lightly used Pottery Barn changing table (for sale IN Williamsburg!) and I got cracking! I whipped together a changing pad cover and a couple of throw pillows from this bright teal and white fabric I had left over from a previous project, and then added some awesome baby art to keep the teal and white theme going. Lucky for me, I have such an extensive collection of kid-art, I didn't have to search hard to find two great pieces in my personal archives. Who says buying excessive amounts of art doesn't come in handy??? : )

I chose two fun area rugs for the window-- one chocolate rug with stripes of teal and pale blue-green woven through it, and one that was a playful teal-colored shag. Both rugs worked perfectly with the teal fabric of the changing pad and throw pillows, as well as the palette in both kid-art pieces. To seal the deal, I threw in two brown canvas boxes that I'd purchased at Target (borrowed from my dining room closet unfortunately!) but they worked so well with the brown in the rug, I couldn't resist! 


If you find yourself in Manhattan, 
pop in and check out Broadway Carpet! 
1285 2nd Avenue (between 67th & 68th Streets)
Tell them I sent you!

How To: Terrarium Tutorial!

Yow-zah! 

I just learned how to make my own terrarium, and I'm so taken with the outcome, I want to teach you all how to make them to...

Here's my little drawing, which you can refer to as you read through my step-by-step instructions:

1.) First things first... Pick an awesome vessel for your terrarium. Ideally, you want something deep enough so that once you put in all of your layers, your little plants will only peek out of the top. Oh yeah-- and it has to be glass. It can be colored glass, but in order to really get the full terrarium effect, glass is a key component. : ) My "terrarium teacher" (friend Samantha) bought this phenomenal candy jar for one of her terrariums. You can find a similar candy jar here... She also recommended checking out the CB2.com stash, where she found all sorts of awesome shaped vases and bowls. I used a square glass vase that I already had, though I'll say, in hindsight, I could have aimed higher... (Ah-- retrospect.)

2.) Now for the rest of your supplies. We purchased these at a local shop in Brooklyn that appears to be devoted to selling exclusively terrarium supplies (can you believe that exists!?) but I'm pretty sure you could pick up most of these materials at Home Depot or a local craft store.

You'll need:
Bag of charcoal
Bag of potting soil
Bag of moss
Assorted small stones
Cute little plants to fill your terrarium. Be careful here. The temptation here is to massively over-buy because they're really cute. However, your terrarium will really look far better if it isn't jam-packed with plants, so channel a little restraint.


(Check out this Better Homes & Gardens article for lots of plant ideas and inspiration.)


3.) Okay! Now we're ready to get building our terrarium! Start by laying a thin layer (about 1/8 the total depth of the terrarium) across the base of your jar/bowl/vase. Then, drizzle a little water over a bit of the moss, and lay a similar thin layer of moss on top of the stones. (Don't forget to refer back to the drawing above if my descriptions are getting confusing...)

Once you've got these two layers down, start adding your soil. You'll want to add sufficient soil that it will be deep enough to plant your little plants, probably about 1-1/2" or 2" depending on the size of the plants. Now-- you guessed it-- you plant your little plants. Again-- you don't want to pack them in too tightly but you can also keep rearranging them until you're happy with your configuration.

4.) Once your plants are situated, you can add little decorative flourishes as you'd like. Extra stones, cool lava rocks, or neat little decorative tchotckas can really make your terrarium jump! Samantha had these terrific miniature houses that she added to one of her terrariums and they made an awesome addition! (You can see my final product above and Samantha's on the right.) As you may have gleaned, hers is far superior to mine. BUT! This is only my first attempt. Hopefully I will improve with time. : )