Saturday, January 31, 2015

Brush with disaster: The perils of parenting...


So whoa. We had our first real brush with calamity this week. Jules fell off our bed, backwards, and landed "all weird" with his arm behind him at a really wiggy angle. I confess-- I wasn't home-- but I zipped back to Brooklyn lickity-split and we spent much of Thursday and most of yesterday in the various pediatric and orthopedist offices associated with our neighborhood. 

After numerous examinations (always popular with a two year old) we've finally emerged with a clean (bruised) bill of health, and managed to avoid the trauma of getting a cast. (Possibly more dreadful for parents than child...)

Bullet dodged.


Lesson learned. No more monkeys jumping on the bed! 

Staple Salad, Taken To the Next Level!

I'm not sure if I've mentioned this salad before (I'm pretty sure I have...) but it's pretty much become a staple between a group of our friends. Literally every time we meet for dinner, the question is not "Should we make the spicy kale salad?" but rather, "Who will make the spicy kale salad?" You can serve this salad with pretty much anything, and all of your friends who "don't really like salads" will be inhaling this dish. I swear. I've seen it happen.

BUT. If I thought it was good before, I've just elevated it to a whole new place. Yep. Elevated it. Now that's fancy. 

So first, I start off by preparing this salad, pretty much exactly as suggested:

Chopped Black Kale Salad w/ Spicy Anchovy Dressing, Hazelnuts and Aged Gouda
For the dressing:
1 Egg Yolk
2 teaspoon Worcestershire Sauce
2 teaspoon Sarocha Hot sauce
Juice and zest of 1 Lime
2 tablespoons Sherry Vinegar
2 filets of salt Cured Anchovies rinsed and minced
2 cloves minced Garlic
2 tablespoon finely grated aged Gouda Cheese
¼ teaspoon freshly ground Black Pepper
1 cup Olive Oil
Whisk together all ingredients other than olive oil until thoroughly incorporated. Slowly drizzle in olive oil until fully emulsified

Assembling the salad:
1 pound very thinly sliced Black Kale
2 ounces of aged Gouda
¼ cup Hazelnuts, toasted and chopped
Toss chopped kale with enough dressing to lightly coat. Then set on serving plate.
Shave Gouda liberally over the kale and garnish salad with hazelnuts.

But here's where things get serious. I picked up a lovely looking kabocha squash at the grocery store, and followed the recipe below to make a savory, sweet, utterly delicious roasted kabocha which complements the spicy-fishiness of the anchovy salad perfectly. I mean PERFECTLY. Make this. And then make it again next week. It's the perfect go-to to add to any dinner. We ate it with homemade pizzas one evening and then three nights later, ate it with veal meatballs and hazelnut polenta. And if all goes well, we'll eat it again next week alongside a whole trout. 
ingredients
  • 1 teaspoon cumin seeds,toasted 1 minute in a dry skillet ground coriander seeds
  • 1 bay leaf
  • 1/4 teaspoon smoked paprika (pimenton) or regular paprika
  • 2 teaspoons packed brown sugar
  • 1 teaspoon sea salt
  • 1 kabocha squash (about 2 1/2 pounds), partially peeled, seeded, cut into 1-inch chunks
  • 1 tablespoon olive oil (maybe a little more...)

preparation

Heat oven to 375°F. Combine cumin seeds with bay leaf and paprika in a spice mill or clean coffee grinder and process briefly spices in a mortar & pestle and grind until smooth. Add sugar and salt and then mix thoroughly with mortar & pestle. process to combine. Set aside. Toss squash with oil, then cumin coriander mixture. Spread on 2 baking sheets and roast until tender, about 25 minutes.
Obviously the main alteration to this recipe was the absence of the cumin. John isn't a big lover of cumin, plus we didn't have any in our pantry, so he opted for coriander seed instead and it was a delicious substitute. The squash comes out savory and aromatic, without tasting too much "like socks" according to John. 
Delicious! 

Wednesday, January 28, 2015

Add It To The List: Salvaged Ceiling Light Fixture

You'd think eventually I'd have the sense to stop piling more stuff onto my to-do list, but the hoarder-obsessive-perfectionist in me (she's a vocal presence, lemme tell you!) just can't resist a project when it presents itself. Hard-wire sconces when we could use table lamps? Yes please! Install a new ceiling fixture where a perfectly good one (though not perfect) already exists? Abso-freaking-lutely.


If there's an opportunity to improve or upgrade, particularly if it involves climbing into a dumpster or riffling through a trash can- I'm your gal! 

So it goes without saying that when this ancient brass flush mount fixture was demo'd out of a project I'm designing on Park Avenue and 66th Street, I was happy to intervene on its behalf. It no longer had a sensible home in the ultra-contemporary home office we were installing, but that didn't mean it didn't have a home with me. The fact that it looks almost exactly like a port-hole on a boat might have been off-putting to some people, but for my needs-- tucked above the canopy bed frame in our guest room upstate-- it is going to be PERFECT! 

Can't wait to get it up and shining. 

AHOY! 

Monday, January 26, 2015

Deep in the snow storm... with only my dreams to keep me warm!

Well we're only three and a half hours into the "blizzard of the century", and I'm already trolling the internet for cozy, comfortable bed linens to shield us from the storm. 

Holy piles of beautiful bedding. I just discovered this new bedding website, Parachute Home and I'm pretty much completely smitten with their linen-y-striped bedding collection. It looks so warm and inviting, but simultaneously, I can also imagine using it in the summer and having it feel breezy and bright. Not only is the aesthetic perfect for our farmhouse, but finding bed linens that work year round is no easy task. I'm pretty psyched.

It doesn't hurt that every time I look at that photo, I start to design-salivate.

Yep. That's a thing. 

If you've spent much time with me or seen photos of any of our bedrooms, you probably already know that I'm pretty hardcore-slash-a- little-ridiculous when it comes to bedding (down duvets, down pillows, LOTS of pillows...) and I take my whole bed situation extremely seriously.

I'm not kidding! We all spend way too much time in our beds to be sleeping with depressing thread-bare blankets and floppy sad pillows that make our necks hurt in the morning. It's just not cool. When I get into bed every night, I want to feel like I'm climbing into a decadent hotel bed-- layers of big puffy pillows, a soft fluffy duvet in a cool, restful print, and if I'm really feeling posh, some kind of throw blanket that I can snuggle up with when I'm not ready to get all the way in just yet. Since I probably can't afford to stay in that fancy, decadent hotel of my imagination anytime soon, the least I can do is recreate it in my home by scouring Parachute's website instead.

Maybe I can go to that fantasy hotel when I'm forty... 

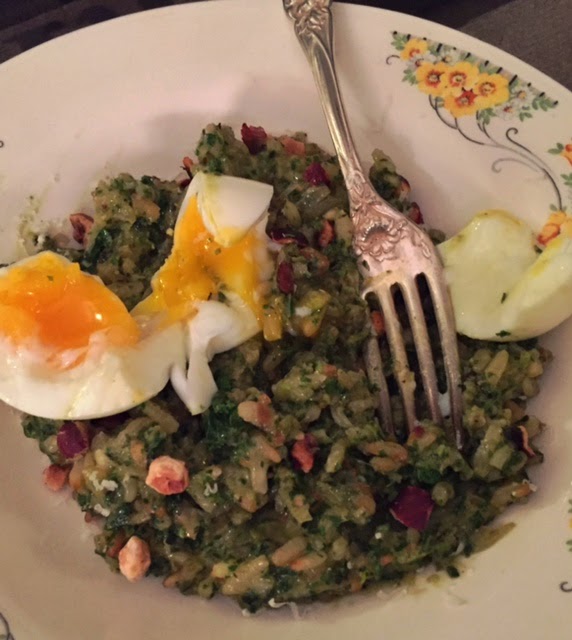
Latest Culinary Conquest: Healthy Oven Risotto with Kale-Walnut Pesto

After a long weekend of playing, eating (& drinking!), and lots of entertaining, John and I were eager for a hearty but healthy low-fuss dinner upstate, and I knew just what I wanted to try. My friend had pointed out this recipe for Oven Risotto with Kale Pesto while we were in the grocery on Saturday afternoon, so I enthusiastically looked it up on the Bon Appetit website, and then, because I'm me, changed half of the ingredients to work with what I had in the fridge. I know, I'm hopeless, but evidently I have fairly good instincts because it still emerged delicious. 

And then, we put an egg on it. Because why would you not put an egg on it?!? 


Oven Risotto with Kale Pesto


Ingredients

SERVINGS: 4
  • ½ cup walnuts, coarsely chopped, divided
  • 4 tablespoons olive oil, divided
  • 1 medium onion, finely chopped  *I used 1-shallot and the whites of three leeks, all thinnly sliced rather than chopped...)
  • 1 cup arborio rice
  • Kosher salt and freshly ground black pepper
  • ½ cup dry white wine
  • 1 small garlic clove *I pretty much don't believe that 1-clove of garlic is ever enough. I used 3. : ) 
  • 1 cup (packed) fresh parsley leaves
  • 3 tablespoons chopped fresh chives *I know. It's barely the same recipe at this point. I used basil instead of chives. Totally different. What can I say? It's what I had. 
  • 2 cups torn Tuscan kale leaves, divided
  • 2 tablespoons unsalted butter *Oh my god. I skipped the butter entirely. But everywhere they said "Add water" I added chicken stock, so I think I compensated flavor-wise there... 
  • 3 ounces Parmesan, finely grated (about 2 cups)


Preparation

ACTIVE: 40 MINTOTAL: 45 MIN
  • Preheat oven to 350°. Toast walnuts on a rimmed baking sheet, tossing occasionally, until golden brown, 8–10 minutes. Let cool.
  • Meanwhile, heat 2 Tbsp. oil in a large ovenproof saucepan over medium heat. Add onion shallot and leeks and cook, stirring often, until softened and translucent, 5–8 minutes. Stir in rice; season with salt and pepper. Cook, stirring, until some grains are translucent, about 5 minutes.
  • Add wine, bring to a simmer, and cook until pan is almost dry, about 3 minutes. Add 2 cups very hot water chicken stock; season with salt (skip this until the end, as stock has a lot more sodium than straight up water...) and pepper. Bring to a simmer, cover, and bake in oven until liquid is mostly absorbed but rice is still starchy in the center, 15–18 minutes (it should be undercooked).
  • Meanwhile, pulse garlic and half of toasted walnuts in a food processor until very finely ground. Add parsley, chives basil, half of kale, remaining 2 Tbsp. oil, and ¼ cup cold water chicken stock; process until smooth; season pesto with salt and pepper.
  • Set saucepan over medium heat. Add ¾ cup very hot water chicken stock and cook rice, stirring constantly, until it is tender but still has some bite and sauce is creamy, about 3 minutes. Stir in pesto, butter, three-quarters of Parmesan, and remaining kale. Adjust consistency with water stock, if needed; season with salt and pepper. Serve topped with remaining walnuts and cheese. 
  • We served ours with a six-and-a-half minute steamed egg over the top, but a poached egg or a fried egg would probably do the trick too. 

  • And if you wanted to throw healthy out the window, you could probably lay a few pieces of prosciutto over the top and you wouldn't be making any enemies. Just sayin'... 

What a weekend!!


Sorry for the lull in posting this weekend, but we had friends up at the house and we were fully occupied with non-stop cooking, loads of snowy walks, and lots of layin' around-- pretty much exactly what you're meant to do over a wintery weekend up in the Catskills.


I confess I haven't tackled a single project and probably won't get started on the installation of my new sconces until next weekend (the price one pays for relaxing!!) BUT I did pick up a cool new ceiling fixture for the guest room too (Free to me! On its way to the trash heap coming out of an apartment on Park Avenue, but I intercepted it!) I'm thinking we'll handle all the electrical projects in one swoop: I'll install the new ceiling fixture while John channels out the walls for wiring the sconces (while cursing the day I found those sconces and wondering why HE got the hard job...) Check back in tomorrow and I'll post a snap-shot of my salvaged ceiling fixture-- in the interim, you can enjoy some pics from this weekend-- and stop by later today when I'll post the details for the recipe I'm trying out tonight-- it sounds like a winner!!

What a weekend! 


Wednesday, January 21, 2015

Fill in the blanks...

 So yesterday I mentioned these "fantastic gooseneck sconces" that I just picked up for our canopy-bedroom, but I didn't really expand beyond that...

Here's the scoop: I stopped by the Build-It-Green in Gowanus yesterday afternoon to have a quick poke around, (because sometimes you don't know you need a 4-person copper bath-tub until it's staring you in the face) and happened to stumble upon something else that I just couldn't leave behind...

What do you know?!? It was a pair of gorgeous antique goose-neck sconces. These beauties are solid brass, apparently handmade, and have lovely, intact milk-glass shades on them. They appeared to be unpriced so I apprehensively brought them up to the desk and crossed my fingers. The thing that's tricky about Build-It-Green is sometimes things are, "WHAT?!?!?" expensive. Considering everything in there is donated, you're kind of like, "Really? You got that for free. You're going to charge me FIVE-HUNDRED DOLLARS???" Which I realize is probably a rather simplistic evaluation of their situation. I mean, I know they have to pay rent, and their staff, and so on... Ok, ok, ok. They're running a business too, you're not wrong, but sometimes it feels like you're just shopping in a really drafty. really large, kind of dirty antique store. But then-- sometimes you find a gem, and it makes it all worthwhile.

So there I stood with bated breath-- waiting to find out how much these lovely lamps cost. The woman at the desk says, rather dismayingly, $120.00 each. EACH. I nearly fell over. I'm not usually in the habit of buying $120.00 lamps, lemme tell ya. But then the guy next to her said, "Whoa, whoa, whoa. $120.00? Those are antique, hand-made brass sconces with their original milk glass. We got those out of a Park Avenue townhouse. They're $250.00 a sconce. No less." Two-fifty! I gulped. And said, "Oh man. The price is going up and up and up before my very eyes..." The woman looked down at me, at my crest-fallen face, and took mercy on me. She said, "Look. I'll give 'em to you for $120.00 since that's what I said. But you're getting the deal of a lifetime. " And then before I knew it, I was paying $240.00 for two sconces. It's possible those freaking lights are going to be the two most expensive purchases we've made for our entire farmhouse. I mean-- it's pretty much just them and the dishwasher. They better look freaking awesome once they're up, I'll you what.

Tuesday, January 20, 2015

Next Before-And-After: The Canopy Bedroom!

I know! Can you believe there are still more rooms to look at? Imagine how we felt when we were tackling this beast. One room after another, after another. And there's still plenty of work left to do, make no mistake. We'll probably still be renovating this house until Jules leaves for college, and he'll look back fondly on this time as the "twenty years that my parents neglected me while they slowly fixed up our country house..."

Okay. Enough woe-is-me talk, let's get down to business. The next room on the docket: The Canopy Bedroom.

Of all the rooms in our farmhouse, this bedroom gets the most spectacular morning light. If I had my way, we'd be sleeping in here, but sadly, once we realized there were only radiators in two of the bedrooms, it seemed like the natural choice to sleep in one of those instead, so we weren't needlessly heating a room with nobody in it... Alas. Practicality can be a downer.

before


It started out like this-- another room clad in wonderfully romantic, tragically molting wallpaper with beautiful dogwood flowers and branches woven up and down the walls. Truly a beauty of a bygone era... I really put up a fight in this room, but eventually I resigned myself to removing the wallpaper and we installed new drywall and a terrific school house light fixture (which originally hung over our dining room table in the Sparrowbush cottage) and then, in a major low-budget victory, I found a sensational antique canopy bed for $75.00 on Craig's List! This bed pretty much makes the room, so it goes without saying that I'm pretty pleased with it.


I confess, I don't even remember what I was searching for when I found this beautiful canopy bed, but I'm pretty sure I wasn't looking for a canopy bed. Craig's List can be like that-- it's a little "down the worm hole" as John likes to say-- one minute you're looking for one thing, which then leads to something else, and then you're like, "Actually maybe I do need a ---- " and before you know it, you find yourself in a volkswagen with a pitbull, a two year old, and a mildly annoyed husband, en route to Connecticut, and you're like, "How did I get here again???" If you find yourself in this situation, I recommend politely apologizing to your family and then staying the course, because in the end, you come out with a $75.00 antique canopy bed!
after


And ta-da! Now it looks like this! The walls are painted Benjamin Moore's Healing Aloe #1562 (I know. I'm a broken record) and it's pretty darn cute. We've still got a couple more projects in the works for this room-- I just picked up this fantastic pair of antique brass goose-neck/swing-arm sconces and John has promised me that we'll get them installed over the next couple of weekends.

Then there is also my on-going to desire to wallpaper this room, but I think we're still a fair ways from doing that, because wallpaper is just too freaking expensive. I'm bummed out actually. I have fantasies of wallpapering the staircase, the downstair's bathroom, and this bedroom, but all of those lofty plans are on hold until I win the lottery or earn a lot more money. I guess that's how the cookie crumbles... If you spend four months in France, don't be surprised if you don't have enough money for wallpaper when you get back. C'est la vie!

I'll just cross my fingers for the lottery in the meantime. 

Sunday, January 18, 2015

Just a little Jule-bug...


Sorry, but I can't resist sharing this one... I snapped this photo as we all went skittering along our driveway earlier this afternoon. It was decidedly treacherous up at the farm today, but we all managed to have a terrific time slipping and sliding along! And you should have seen the dog-- he looked like he was wearing roller skates.


What a trooper! 

Next on the to-do list: Windsor chair make-over!

Just when you thought we might be finished working on our farm house, I decided to tackle a quick-and-easy Sunday project, spray painting a pair of woebegone windsor chairs that I inherited from my mom's best friend.

Just to be crystal clear-- he is not dead. He just got better chairs!

This was a pretty straight forward project, aside from finding a relatively warm place to spray paint in mid-January. That was a drag, let me tell you, but once I'd set up a well-ventilated place to spray paint, I got cracking!! (Don't worry-- it wasn't in my dining room!!)


These ol' boys were pretty bonked around-- I actually think these photos
make them look better than they did, I swear! 
Spray-Paint: Round 1
*As a side note: I did this first round with generic paint that we picked up at the Dollar General.
BAD MOVE. Discount paint is cheap for a reason. It's the WORST!!!
The coverage was abysmal, and it took buckets of paint to get a decent primer coat on.... 

However, I discovered two cans of rust-o-leum in my basement (I should really just order this stuff by the case, I use it so frequently) and that saved the day! 6 cans of paint later, and these babies were renewed! I tossed a couple of cute pillows on there and -- bada-bing -- such an awesome addition to our dining room in Callicoon. 


Our Next Before-And-After: The Real Winner!

One of our major victories in the battle of home renovation was the transformation of our kitchen in Callicoon.

It started out basically gutted, though laden with ailing appliances. The fire-friendly double oven-stove was positioned in the middle of the room, probably because when you plugged it in, it smoked and sputtered if you looked at it funny, let alone when you tried to use it (if one was capable of overlooking how greasy and gunky it was...) The refrigerator was an "energy-efficient" model circa 1992-- approximately the size of a station wagon and lined with mold-- and the sink was a high-class home depot particle board/decaying cabinet operation that had been on the receiving end of many mice families and a considerable amount of water damage.

before


We began our transformation by pulling up the old linoleum flooring, refinishing the floors, painting the whole thing top-to-bottom with primer and then paint; and then we were ready to tackle the big stuff. We brought our beloved Chambers Stove from our old house in Sparrowbush (and sent the fire-trap packing!), found a fantastic out-of-the-box Summit Bottom-Freezer Refrigerator on Craig's List (normally $1,200.00, ours cost $350.00 delivered) because it has a minuscule ding on the front door. Lucky for me, I've got a 2-year-old who is bonkers for magnets, so I challenge you to locate this teensy ding if you're ever in my house.

Not only that, but this Summit Bottom-Freezer is quite possibly the nicest not-high-end refrigerator I've ever encountered, and I now recommend the non-dinged version to clients all over NYC. I admit, it doesn't hurt that I paid about 1/5 the typical price...

after


Then began the challenge of the cabinets and the sink. I had acquired an incredible set of solid-wood kitchen cabinets from Build-It-Green in Gowanus, Brooklyn for a whopping $450.00 (Yep! For the full set! Three huge lower cabinets and two sets of 60" wide uppers with glass cabinet doors!!!) The challenge was that those cabinet didn't exactly fit into our kitchen, nor did our ginormous 400 pound cast-iron farm sink fit into those cabinets. John and I worked with a handy friend of ours and spent a series of tense days looking at those cabinets from all angles, me drawing-and-re-drawing different configurations until we finally figured out how to make them fit the way we wanted. (Though the uppers are still waiting for us in the barn until we renovate the pantry, where they'll be eventually be installed...) With a fair amount of retro-fitting and rejiggering, we made it all work, and now they're the star of the kitchen. Especially after we primed-and-painted them all Benjamin Moore's "Night Train" (1567) -- things really came together.


The last step: We topped our counters with Silestone's Lyra Polished Counter Tops (courtesy of the Lowe's follow-up segment from my brief stint on NBC's American Dream Builders) and we were really movin' and a shakin'.

These days, that original kitchen with its linoleum floors and angry appliances feels like a distant memory. And thank goodness!!!

Friday, January 16, 2015

Just in case you had your doubts...

...The New York Times also thinks the Catskills are pretty darn great... 

We made it on the "52 Places To Go in 2015" and we couldn't agree more! 


Thursday, January 15, 2015

Next Before-And-After Feature: Upstairs Guest Room

Okay. New York Times piece published. Pretty psyched! 

Now let's keep on reviewing our before-and-after conquests before I run out of steam!!! 

Our upstairs was originally composed of five rooms-- three lovely bedrooms, a teeny tiny rectangular room, and a weird, mysteriously shaped "L" room with a peculiar gnome door. We immediately chose the two bedrooms with radiators for our bedroom and Julian's bedroom (because there's no point heating a room no one is sleeping in) and then tried to figure out how to best approach the remaining three rooms. We ended up chopping the L-shaped room into two lovely bathrooms (and replacing the door!), so that meant the teeny-tiny room would function as a guest room... With so little space and basically no architectural charm, we decided to install beveled panel-siding through the entire room and then bead-board paneling onto the ceiling. We threw in a lavish chandelier and a snazzy antique bed frame and we were in business! 

before


during


Now that little room is actually my favorite room in the house-- too bad it didn't make it into the Times piece this morning... You guys are missing out!

after


Oh yeah... That baby is brimming with architectural charm now. 

Keep checking back in for more before-and-after shots this week. 
We've got plenty more to show you!!! 

Wednesday, January 14, 2015

Check Us Out!! New York Times Home & Garden Feature Today!!!

Yes! It's true! Our wonderful Catskills Farmhouse has just been included in the New York Times Home & Garden Section -- check it out online right now, and then pick up the physical edition of the paper tomorrow morning!!!


We're so psyched to be featured in the Times, and want to give a big shout out to the talented Jane Beiles and Steven Kurutz for the terrific photography and awesome article.

Be sure to tell all of your friends, neighbors, and colleagues. If you know 'em, send 'em the link! We want the word to get out about our lovely farm house!!

Ps. Please forgive the dreadful family photograph included in the slide-show. We sent them a dozen, and they vindictively chose that one as their favorite. What are you gonna do?!? 

Pps. Don't forget to check back in again tomorrow-- I'm going to keep doing my before-and-afters until I run out of rooms!!! 

xoxo 

Getting down to game time!

It's almost time to announce my announcement. 

Have I built up suspense this week or what?!? I'm going to keep on posting photos of our near-finished Catskills Farmhouse in the meantime, and you'll have to check back in this evening or tomorrow to get the full scoop!

Check out today's before-and-after: Our living room! Note that all of the floors were originally covered in wall-to-wall linoleum with layers of maliciously (incredibly thoroughly) installed particle board sub-floors below... You've got to love a farmer. It might be an ugly idea, but they're still gonna do it right

before


Yes. I was wearing overalls. Don't judge.


after