Saturday, May 28, 2011

Up at Fox Ridge: Beans, Beans, Beans!

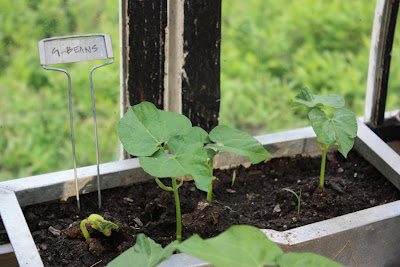
Last year, I attempted to grow green beans in our garden, to no avail. I even asked my local garden nursery if they sold green beans in little pots (because my seeds were such a flop), and the guy looked at me like I had a lobster for a face. "Why would I sell green beans? People just grow those from seeds since they're so easy to grow." I had to resist sticking my tongue out at him. So this year, when I decided to give the beans another shot, I wasn't exactly optimistic.

But lo! YES, LO! 


The beans are flowing bountifully out in the green house, and if they keep growing at this pace, we're gonna be up to our eye-balls in them this summer. Green bean salad, green bean pesto, pickled green beans, green bean casserole? (I actually have no idea how to make pickled green beans or green-bean casserole, but I'm open to both and Julia swears that pickled green beans are delicious...) I'm feeling much more confident that this crop is going to come in this year!


It's a veritable jungle in there right now, with radish and beans sprouting up all over the place, and little signs of arugula and carrots slowly making their presence known. Hopefully, we'll be able to construct a whole salad in the next couple of weeks. 

Until then... We'll just have to rely on the grocery store.

Friday, May 27, 2011

Ps. Just featured...

One last note: We were also just featured on "Delightful Blogs", which is an online guide to the blog world that helps "cut through the blog smog"-- of which there is much!


This is great news, and terrific publicity for After-Dinner Design, but we need your help!


Did you hear that? 

WE NEED YOUR HELP! 

If you've got a second, click the link below and take a moment to rate our blog. This will let other visitors at "Delightful Blogs" know what wonderful reading and marvelous adventures you encounter each and every time you check in at After-Dinner Design!

Take a moment! Only a jiffy! Click the link! 
http://www.delightfulblogs.com/detail.php?id=23657

Thanks for your support team! And thanks to Lynda at "Delightful Blogs" for including us on her site!

Renovate Brooklyn! TIM-BER!

TIM-BER!

That's what they say when they're choppin' down trees in the forest, right? Well, we've done it! We've chopped down our dropped kitchen ceiling to reveal the tin ceiling above. Looking at the photos to the left, you can see the kitchen pre-chopping, when it is still an oasis of peace and calm. No more, my good friends, no more. OH NO. We hacked right into that lovely plane of un-interrupted white plasterboard and now, two days later, we've got a lot of work ahead of us still. Oy.

Check out the grueling play-by-play down below...


We'd like to give a shout-out to the people who originally put up this drop ceiling. They spared no expense! There were enough wood beams holding up the drywall to build another small building inside our kitchen if we were so inclined. Thanks guys! 


John, in action! It should be stated that he did almost all of the demo-ing, since I've had a swamped work week. I joked that it was my anniversary present. He didn't smile. 


This looks very familiar. Reminiscent of the massive piles of plasterboard that have remained after our other projects. I tell you, the hardest work is getting rid of all of this stuff once the demo-ing is completed. Well, maybe I'm speaking out of turn here, given that I didn't do any of the demo-ing, but did do a lot of the clean-up. My perspective may be a little skewed...


After much vacillating, we called our knights in shining armor, the Junk Removal Fellas from Craig's List, and they swept in to do a rapid-fire haul-out for a very reasonable $100+ dollars. 

Worth every penny! 


We were delighted to discover that almost the entire ceiling was in great shape. A little scraping down and some (A LOT of) spackling would get things nicely straightened out. (The ominous stain on the ceiling, in the photo below, is not actually a blood stain or leak coming from above, but an area where John had scraped off flaking paint. Breathe a sigh of relief...)

It's AWE-SOME! 


As anyone living in New York City can attest, the pre-war pressed tin ceiling is the crown jewel of old tenement buildings. It's why we walk-up many flights of stairs, don't have doormen, tolerate rail-road layouts, and have post-ancient people living in the apartment above us, building a bunker out of tin cans. (Okay, in our case, our budget also explains those "amenities", but you get my point...) The point is the ceiling looks totally and utterly terrific. Even if there is now so much more work spread out before us. 

Once we finish repairing the ceiling, we can tackle the matter of repainting the entire room, which I've been patiently waiting to do FOREVER! Every time it came up, I'd talk myself out of it because the ceiling was eventually going to come down. That day has finally arrived! Hurray! 
(John doesn't look like "Hurray" is what he wants to shout...)


Did I mention the matter of this small (medium-sized) chasm in the ceiling over near the fridge? That might require slightly more than "a little scraping and some spackle" to sort out...

Well, I guess we better get cracking, eh?! 

Tuesday, May 24, 2011

Ps. Swoon-Worthy Wisteria!


Wisteria growing up the side of our house in Fox Ridge. 
This is our first year of blossoms! 

Renovate Fox Ridge! Victory: Signs of Life!

We're back on task here people, after another idyllic weekend up at Fox Ridge. I confess that John and I did not start the kitchen-ceiling-smack-down yesterday, because it was our 2nd Wedding Anniversary (which I think is a pretty decent excuse for a little more procrastination) but today is the day, I hope, so I may have more exciting results to report later in the week. I think we're both filled with a little dread-anticipation: We're positive it is going to look awesome once we're finished, but things have been so nice and clean and normal in our house since we finished the living room renovation.
Oh well-- jump right in- right?!? 


In the interim, I thought I'd also include a couple of snap-shots of the action breaking out in our little green house. We have our first signs of life, and I'm beyond excited. Home-grown radishes, here we come! We also had the smallest specks of arugula sprouts coming up too, but they were magnifying glass worthy, so I'll check back in on them next weekend...


Look us! Little Amateur Farmers! 

Does it count as Farm-To-Table if you just put it directly into your mouth instead? 

Friday, May 20, 2011

Renovate Brooklyn! Promises, promises...

You may remember, somewhere deep in the recesses of your memory, that we have been aspiring to pull down our existing kitchen ceiling to expose the original pre-war tin ceiling that is installed above our dropped dry-wall ceiling. There were a couple of postings about it, and we even included a few ominous-looking photographs like the one shown below...

Looking good, right? No wonder we can't resist! 
We've been trying to ignore this project for as long as possible and so far, have had quite a lot of success... More specifically, John has come up with every excuse imaginable to postpone doing this, but he's finally run out of reasons. and we're going to seize the bull by the horns! I even called all of our neighbors, to make sure there was no reason they could fathom why it can't come down (no such luck!), and now I'm determined, DE-TER-MINED, to bring this baby down next week. Come hell or high water. Or probably just a lot of dust, bug skeletons, and other 40-year old detritus.

I thought a quick slide show of lust-inducing, action-inspiring images might help you understand why we would want to pull down our perfectly decent dropped ceiling, and will hopefully also serve as a reminder to us when we are part-way through this horribly messy, very unpleasant task...


I wonder if our windows will magically become massive 5' X 8' panels of light and glass once we pull down our ceiling? Wishful thinking...


Lots to look forward to! 

Have a terrific weekend and we will see you next week, swaddled in drop clothes, respirator masks, and haz-mat suits. 
The fun continues...

Tuesday, May 17, 2011

Renovate Brooklyn! It's Official.

Yes. It is official. I have written the word RESTROOM more times in the last week than I had previously in my whole life before I began this project. Thankfully, I've got my swanky new   "R-ROOM" sign hanging up above the "R-ROOM" door now, so we can take a look and put the whole ordeal behind us. (This will also give everyone a chance to peer into our kitchen!)

I'm pretty happy with the outcome, and as I suspected, now that it is hanging so high up, it is a little less easy to see its imperfections, shall we say? I'm almost tempted to make one of these signs for each door in the kitchen: Laundry Room, Exit, Pantry. I actually think it could look pretty cool, but it does sound a little OCD when I write it out. Maybe one night when I can't sleep? We'll see... 

In Other News...

The other little project I've been working on was inspired by this glass trifle dish I bought ages ago... I don't know why I bought it, but if I was going to have a guess, it was probably to make this recipe. (Mmmm.... Raspberries and heavy cream, oh my!) 

Thankfully (or tragically), I don't eat trifle that regularly, so for most of the year, I had this big, empty, glass bowl on a stand, with nothing doin'. I was determined to fill it with something and make it the center piece of my coffee table in Brooklyn, but wanted it to be something low and colorful, so it added a splash of visual interest to the room without blocking the view of the television. (Yes. The TV must be accommodated. I grimace.)

Obviously I initially thought Victorian Carpet Balls! "What?", you say. Yes, victorian carpet balls. I wouldn't know these existed if it wasn't for The Mother Figure, so don't feel bad if you've never heard of them. They are lovely pottery balls that were painted with all sorts of beautiful patterns and colors, presumably used for some sort of raaaather stuffy indoor game of boule in victorian times (or something like that... I'll ask Mummy for the exact details...) 

Swooon! 

These days, they're usually just epically expensive objet d'art that have been reproduced in gaudy and overly-sweet duplications that don't hold a candle the real thing. And the real things are even more expensive, so that idea went the way of the dodo bird, and I revised my trifle-bowl-plan. 

I have a rickity old croquet set that has been stylishly gathering dust up in the country. In the set, were five old chipping wooden croquet balls that I thought could surely replace my Carpet Balls! plan. Maybe a little dash of paint to brighten them up, and we'd be in business. 

Take a look-see:

BALLS! BEFORE! 
BALLS! AFTER! 

A definite victory for the D-I-Y home team! Now my trifle bowl is full-a-balls and I've got a center piece on my coffee table. This is also officially the free-est project I have ever undertaken. I had the bowl, I had the balls, and I had the paint I used to brighten up the stripes. Whoa. 
Free-High-5! 

If you like the look of this project, but don't have a cache of dusty croquet balls awaiting a new purpose, I think you could also use anything else round: billiard balls, old baseballs, or the fancy re-pro carpet balls if you've got the funds...


Onward and Upward!

Ps. East Hampton House for Rent (and I designed it!)

I just heard from a client of mine that she is looking to rent out her lovely home in East Hampton for the month of August.

If you are local folk interested in renting out a place this summer- take a gander at the photos down below. I actually did much of the interior design of this home a couple of years ago, so I can vouch for its brilliance and beauty. (Ha!)


"Lovely easy to live in 3-bedroom house with 2 baths, AC, heated pool, decks...
About 8 min by car to East Hampton Main Street and 10 min to Sag Harbor.  
Northwest woods/Settlers Landing. Available Aug 1st - Labor Day.
$15,000.00 for the 5 weeks.  Might consider 2 week period.(Non-smokers please, 
dogs: it depends!)"


You can also read a description of the project on my website, and see more photos of the house there... I have stayed in the house numerous times while we were working the project and can assure you of its excellent location and tremendous charm. It has a beautiful pool with surrounding deck, and has a very private feel to it. Highly recommended! 


If you are interested, please contact me via: christina@11211design.com, and I'll put you in touch with her.


To see what else I've been working on, you can also take a look at my website here:  www.11211design.com (though please forgive how out of date some of the images are... It is hard when your "webmaster" is also your brother, who is currently going through medical school and not very interested in dealing with your website because he's learning how to deliver babies and what not.)

Sunday, May 15, 2011

A Quick Addition to the RESTROOM sign...

A couple of people have mentioned that I spaced out the letters on my RESTROOM sign differently than the letters on the original piece, and wondered why... I've got a couple of (scattered) answers...

The Original Art: To Refresh Your Memory
When I started "font shopping" on my computer, I was looking for something a little more modern and cool than the font in the original poster. I gravitated to a font called "Cambria" and started playing around with the size, thickness, etc. Unfortunately, I couldn't just duplicate it exactly because my discount Michael's frame was much taller and longer than the one I'd seen upstate, so I had to re-jigger around the layout to make it work a little better with my frame size. When I was laying the letters out onto the poster board, I found that spacing them out more evenly across the frame (rather than scrunching them in together as the original was) also gave it a more mod-look.

It wasn't until I was finished that I realized that my sign looked very familiar, and that my RESTROOM sign would have been right at home in the West Village, the NYC neighborhood that has been devoured by Marc Jacobs shops. Take a look:

Marc Jacob's Shopping Bag: Check out the font.
My bathroom sign: Same font I tell you! 
For anyone who knows me, you're probably aware that I have a conflicted relationship with Marc Jacobs. I've been known to start ranting like a mad woman when I see another mom-and-pop shop replaced by a Marc Jacobs' children's socks store, but I also have a real love for his leather goods (which I buy second-hand, mind you.) Talk about conflict. 

So maybe I was trying to work this out subconsciously by turning my bathroom into another one of Marc Jacobs' colonies? 

Or maybe I just liked the font and wanted it to be a little more modern for my modern home. 

You decide...  

Renovate Brooklyn! Art... Sort of.

I'm not sure that I'd deem this project a roaring success, but maybe I should just fast-forward straight to the results. TA-DA!


So, that's how my new "RESTROOM" sign came out. It was a slow-going (uncertain) process, that involved me cutting out each of the letters with an exact-o blade, tracing each one onto the poster board, and then carefully hand painting around each of the letters... Then I taped off the edges to make a white border like the image I was copying, and painted in the rest of the black background. It isn't exactly flawless, but hanging over the bathroom door, I think it will be far enough from the ground to disguise my lack of talent. I think the spacing of the letters in the photo above looks even wonkier from that angle, so I tried to take a photo of it head-on, which is how I ended up in the reflection in the picture below. Saaavvvvyyy. I'll be sure to post a photo of it in the kitchen once I get it back to Brooklyn...

TO COMPARE...

<-----Theirs:
                     Mine:------->

Here's a little "action" shot down below: when I had finished painting around the letters but hadn't started painting the background yet. John tried to convince me to keep it like this, he thought it looked "Cool and modern." No dice home slice. 

 *Note the "MOM" frame in the back, which is the discounted extra-long black frame I picked up from Michael's for $9.99. I'm thinking it must have been a left-over from Mother's Day last weekend. Score! 


Friday, May 13, 2011

Renovate Brooklyn! My latest (and greatest?) project...


John and I recently encountered these terrific framed signs in a little shop upstate, and I'm totally smitten. Come on- admit it- they're pretty charming.  

I know they're a little "twee", but I was thinking it would be fantastic to hang a "RESTROOM" sign above our bathroom door in Brooklyn. Our kitchen is surprisingly full of doors and new visitors always end up walking into the pantry in pursuit of a toilet (...which is surprising for everyone involved, because they don't find a bathroom on the other side, and I'm wondering why they're rifling through my pantry...) A big ol' sign above the door could be the perfect way to put an end to that confusion.

Priced at $78.00 per frame, I was feeling like maybe I could churn out something similar on the cheap, D-I-Y style, but now that I've started this project, I'm beginning to wonder if I should have just forked over the cash. This is a tricky (hard-learned) lesson about D-I-Y-ing... it only counts as saving money if it doesn't look ridiculous and home-made when you're finished, and you don't end up wishing you'd just bought the genuine article to begin with and used all of that time doing something more constructive. Like your actual job for instance. Words to live by, people.


Here's the breakdown, thus far: via Michael's Craft Store
$  9.99 Long Black Frame w/ Glass (Originally $15- on sale... Sweet.)
$  1.99 White Poster Board
$  3.99 Basic Black Acrylic Paint                                                          
$15.97 In Crafty Materials 

Time spent futzing around on my computer trying to figure out how to do the lettering so that it will show up white with a black background: About an hour. Is my time worth nothing, I ask you? I know, I know. "Use a stencil" you're saying. But all of the letter stencils at Michael's were itty-bitty, and I'm looking for letters 3 to 4 inches tall. You think you're so smart... 

I am going to tackle this project tonight and will report back. Hopefully with stories of glowing success rather than out-right failure. And you can bet your bottom I'm gonna make a greenhouse sign too if this all works out well in the end.

Check back tomorrow for stories of woe or glory...

Fingers crossed for glory.

Wednesday, May 11, 2011

Yippee! We've been featured on Apartment Therapy's "RE-NEST"!

More Super News On The Home Front! 

Apartment Therapy's "Re-Nest" just picked up our Greenhouse Project, and included it in today's "Small Cool Book". I am beyond stoked to be a part of the Re-Nest Website-- they focus primarily on great green-oriented home design, or Abundant Design for Green Homes as they put it, which is seriously up my alley!


Be sure to zoom over there and take a look... and let them know you're coming from here!
http://www.re-nest.com/re-nest/gardening/greenhouse-constructed-using-antique-windows-after-dinner-design-146161

While you're there, you might notice a particularly enthusiastic comment, posted shortly after I posted a comment including a link to the latest and greatest greenhouse photos. In a pretty embarrassing twist-of-events, a friend of mine went onto the computer after I had posted that initial comment, read all about the greenhouse, and felt inspired to post a comment of her own, not knowing that it would show up under my name. AWWW-KKWARDD. So... although I would very much like to think of the greenhouse as "inspirational" it was not I who said as much, though I think it's awesome that she felt that way...  In any event, please feel free to click the "Post A Comment" link on the Re-Nest site and write lots of new comments so I don't look like a crazy person, singing her own praises to the people of Re-Nest. Whoops! 


I'll be posting again tomorrow to show off my 
next exciting D-I-Y project, so stay tuned! 

Renovate Fox Ridge: Good Old-Fashioned Luck at La Maison Verte!

The last couple of days have been a 
REUSE-REDUCE-RECYCLE-REPURPOSE 
dream come true! 

The Story Of The Glorious 20-Ton Cast-Iron Farm Sink: Triumph #1 You'll never believe this, but John and I found the sink abandoned near our house upstate. Actually, we first saw it a few weeks ago, and there it remained, unloved and alone, and unspeakably heavy ever since. To have found the sink was unto itself a miraculous occurrence, but to get it home was going to be a very un-holy matter. The sink weighs slightly more than John, me, and John's extended family combined, so we devised a (faulty) plan to get it back to our house... hand truck. Ha. Wait, maybe we should all take a second and say "Ha" again. We are fools! Optimistic fools, I tell you. It was up-hill, rolling all the way back to our house, and if it hadn't been for a fortuitous encounter with a truck-driving neighbor who happened along, it is distinctly possible that we would either still be pushing the sink up that hill, or we too would have abandoned the sink. But- lo! There he was, laughing at the two of us struggling along with our (now) misshapen hand-truck and the trillion pound sink, and after a little more teasing, into the back of his pick-up truck it went. Hats off to that guy! I have promised him my first hot-house tomato in exchange for this tremendous act of kindness. To date, the sink is not actually connected to anything, but the game plan is to run a hose into the greenhouse to connect to it, and then another tube out of the greenhouse to let it drain.

It's gonna be awwwweeesssooomeeee! 


Re-Purposing Old #$!* We Should Have Thrown Away: Triumph #2 Once we'd gotten the sink up to the greenhouse, we had to figure out how to get it-- well- up. You know, sink height. Then I remembered that we had a slowly decaying (mostly molding) panel door in our basement that was missing one of the recessed panels. (It was one of many broken prizes that came with our house when we bought it.) Up came the door, and after a little adjusting with the circular saw, it was a fine table top. Then I grabbed five big hunks of wood that were scraps from building our fence, and bolted them and bracketed them onto the table top. Now we were in business! John and I lifted the sink up and plonked it into the opening I had cut for the basin, and voila-- sink table! Free! Plus, now there isn't a moldy door in my basement or five big hunks of wood behind my house! Even better! 

...And The Bargain Basement Yard Sale Finds: Triumph #3 Writing about these particularly incredible finds makes me worry that I might be making enemies in the D-I-Y community, because they were plum lucky and no real work on my part. Last fall, we picked up that spindle-legged farm table for $2.00 at a yard sale, and then found the industrial looking green pendant light for $5.00 at another sale. When I bought them, I had no idea what I was going to do with either thing, but it was just too good of a deal to pass up. And what do you know? Now they've found the perfect home! There is still a lot of work left to be done before the greenhouse is totally finished, but I am so chuffed with everything we've accomplished in the past two weeks. And now I have to get planting so that my little seeds can enjoy their brand new digs ASAP. 

I tell you-- the D-I-Y-ers work is never finished! 


I've got a new Do-It-Yourself Project in the works for tomorrow, if I can squeeze it in, so check back to see what I'm up to next! 

Have a great day!

*Note: I'm pretty sure La Maison Verte is NOT french for The Greenhouse, but it has a nice ring to it. If you know, please feel free to fill me in. 
Merci beaucoup. Or as some prefer to say: Mercy buttercup. 

Monday, May 9, 2011

The Best Laid Plans...

I was planning not to show any more photographs of The Greenhouse Project until it was completely completed, but alas-- I could not have predicted how indescribably beautiful it would look this evening. 

What are you gonna do? I can't possibly not show off these lovely photos (taken by the considerably more photo-taking-talented husband), but I also don't have the steam tonight to tell the full story of how we acquired that hulking mass of a cast-iron farm sink or how those two awesome farm-lookin' salvaged tables came to be...


So you'll just have to check back tomorrow for all the juicy details! 

In the meantime, you can enjoy the beautiful photos and I'll rest my aching back...